Sound Design is a crucial element in many aspects of our daily lives, from movies, games, music, and even some of your favorite Netflix shows.
Kerwin, our project leader, listens to a lot of music and has researched to bring you a detailed look into what makes sound design great.
Now, think about the last song you’ve listened to.
How did it make you feel? Was it catchy, upbeat or emotional?
Next, think about your favorite song and ponder for a moment
– what is it about the song that made you attracted to it? Was it an amazing sense of rhythm or was it a memorable melody that got stuck in your head?
To start off the sound design tutorial, we will be introducing you to some basic music theory to help you understand more about the music you love and how it was made.
To start things off, let’s talk about pitch!
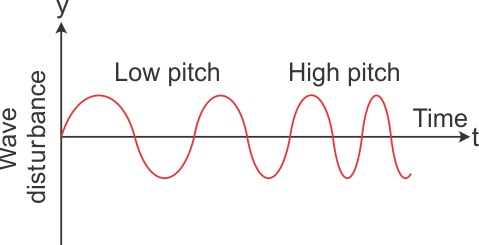
In physics, the pitch is defined as the frequency of sound or more literally, the loudness of a sound.
From this illustration shown below, we can see how a higher frequency leads to a higher pitch, which leads to a louder sound.
The very same theory can be applied in music. In short, higher frequency = higher pitch = louder sound.
Secondly, the rhythm!
Rhythm is in short, the placement of sounds in time. Rhythm is present everywhere in our daily lives. For example, the pattern of sound produced from simply knocking a door is also considered a rhythm!
Rhythm is also ever-present in hip hop songs. There are many patterns used in the production of the songs such as the beat patterns and the bass patterns.
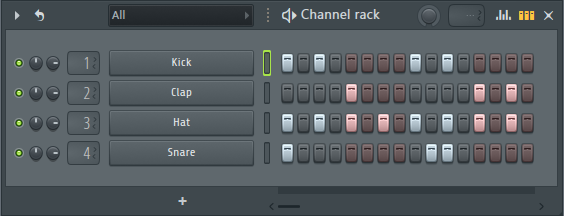
The example shown above is a simple beat pattern I created. As shown, rhythm is ALWAYS present in music.
Some popular music producers include Kanye West and Metro Boomin.


Last but not least, melody!
Melody is perhaps the most identifiable element in music. It is the most memorable and important part of a song as well. Melody, also defined as a tune, voice, or line, is a linear succession of musical tones that the listener perceives as a single entity. In short, a melody is a combination of pitch and rhythm.
Melody is also everywhere around us! One simple example of a melody is when you sing a happy birthday song to your friends and family. Here is an example of a melody created in FL Studio.
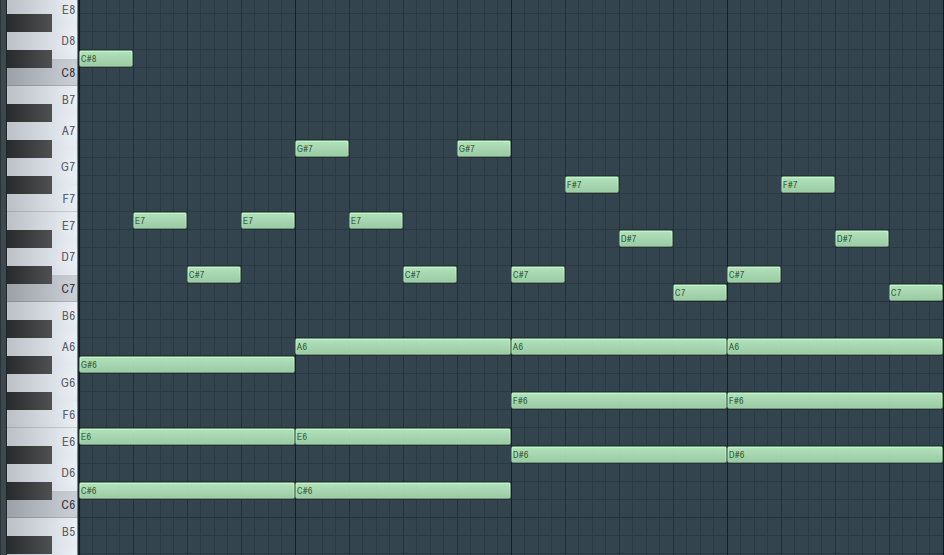
As you can see, the melody is made up of chords as well, which are a great way to enhance the melody.
Additionally, we’ll be explaining a bit more about some popular audio effects – Reverb and Equalisation (EQ).
Reverb and Equalisation (EQ)
Reverb, simply put, is the sound when it reflects off any (hard) surface to create a complex echo. There are many plugins and tools available to create your very own reverb sound such as Fruity Reeverb, which is bundled with FL Studio.

As you can see, there are many different parameters to achieve your desired reverb sound.
Here are some common reverb parameters explained:
Type – It is simply defined as the type of space you want to create. Think of it as the ‘room’ you want to create
Pre-delay – Simulates the amount of time it takes for a sound to leave its source and create the first reflection (echo). Increasing the pre-delay gives the feeling of a bigger space.
Decay – Determining how long it takes for the reflections in the room to run out of energy
Dampness – Shortens the reverberation time (or at least for higher frequencies) by absorbing the energy of each reflection. It also affects the overall tone of the sound e.g. higher damping warms the sound up while lesser damping would imply the sound needs more ‘air’)
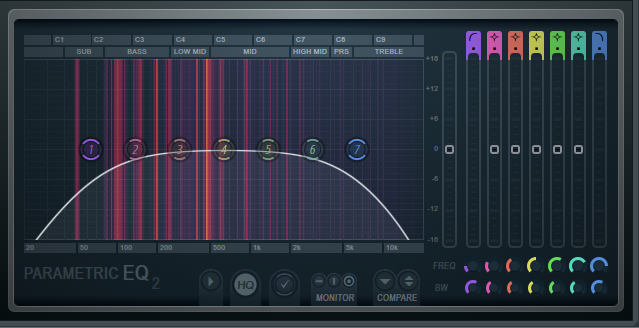
Equalization, on the other hand, is the process of changing the balance of different frequency components in an audio signal. It is the tool you use to manipulate the frequency content of your sound mix so that everything is balanced and clear. An example of an EQ plugin is Fruity Parametric EQ.
As you can see, there are many different parameters to achieve your desired EQ.
Here are some common EQ parameters explained:
Type – Determines the general shape of the EQ band
Gain – Determines the amount of boost or cut you apply with your EQ. It is measured in dB. Positive gain values indicate a boost, while negative ones make it a cut
Frequency – The center of your EQ band’s action. This parameter determines the range where boosts or cuts will occur
What now?
With the sound design tutorial coming to an end, it’s time to get back to your Digital Audio Workstation (DAW), and create the perfect sound!
Here’s a Short snippet of something we’ve been working on for our game as an example!
Stay tuned for the next article tomorrow where we will be teaching you how to create your very own melody, similar to this! Follow @amphibistudio and @projectj2k for updates.

