Intro
Welcome back to Chicken Time! In today’s tutorial, we’ll be covering about item collection and monitoring player stats. For instance, how to collect eggs, keep track of them and win the game. So, let’s get started!
Chicken Time is a simple mobile game reminiscent of Snake. We’ll be posting a series of tutorials every weekday! Hence, at the end of the series, you’ll have your own version of Chicken Time that you can play on any Android mobile device 😉
Missed the first part of this tutorial series? You can check it out right here!
If you want to jump right into this tutorial without having to set up your own environment, or you just want to follow exactly what we did, then go ahead and import this package into your project. It contains all the assets you’ll need, along with a ready-to-use scene!
Note: Import the Post-Processing package using the Unity Package Manager after importing the aforementioned package.
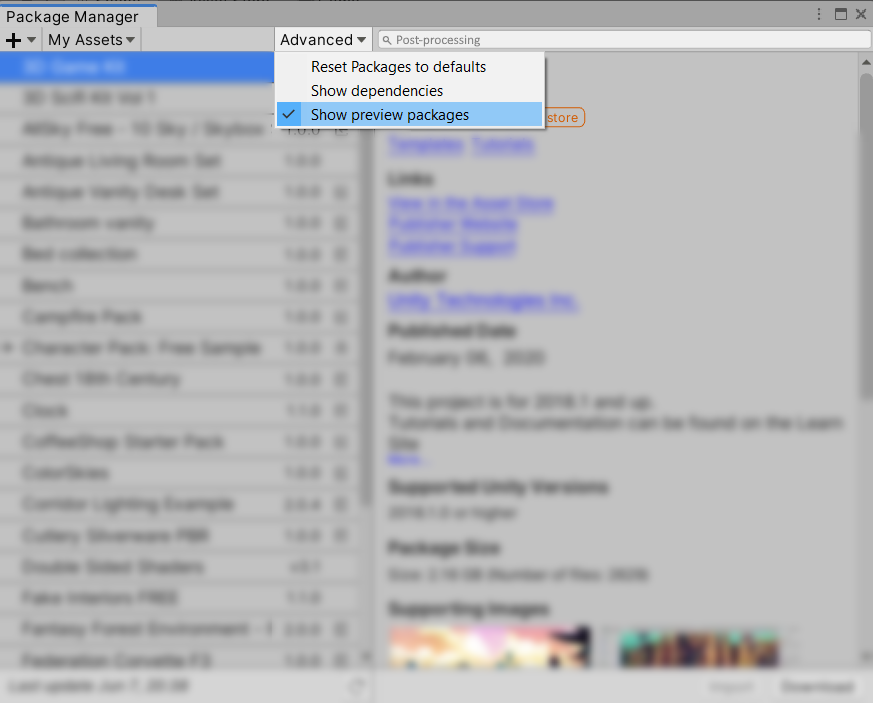
If you can’t find it, make sure that “Show preview packages” is enabled.
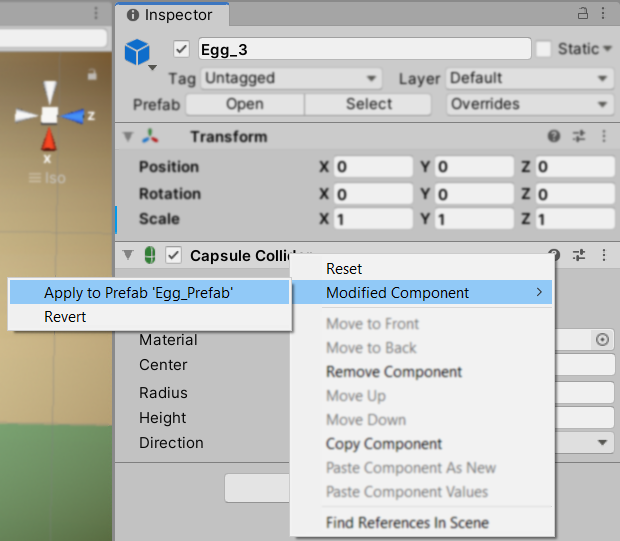
Step 1: Add colliders
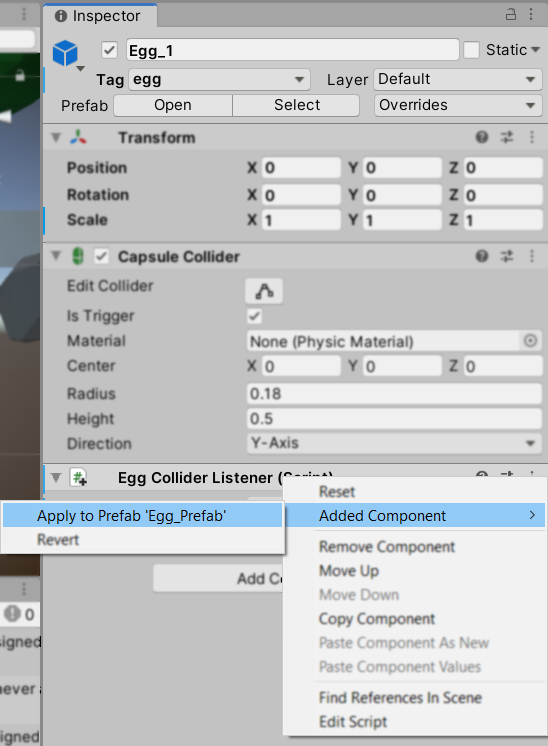
Firstly, add a capsule collider to your egg, any one in the scene will do. Then, make sure to set ‘Is Trigger’ to true. This will result in the eggs not having a physical collider that interferes with your chicken. Here’s a quick rundown of how to do it.
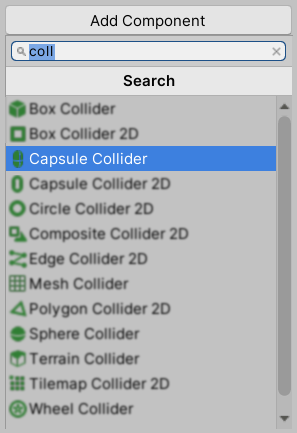
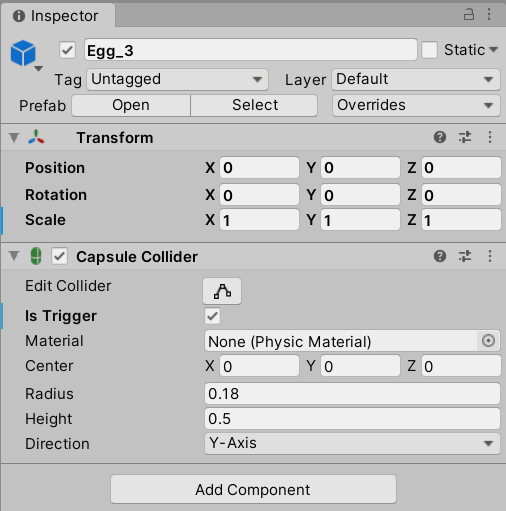
In addition, remember to apply it to the egg prefab.
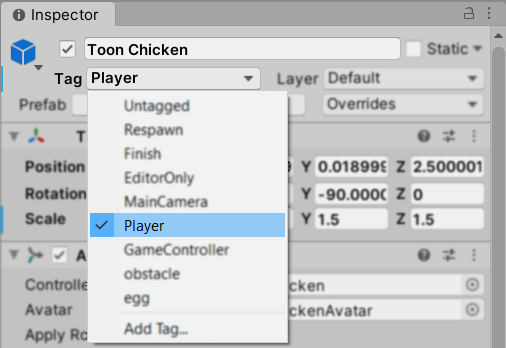
Step 2: Add the ‘Player’ tag
Next, add the ‘Player’ tag to the chicken. Here’s how you can do it.
Step 3: Collecting Eggs!
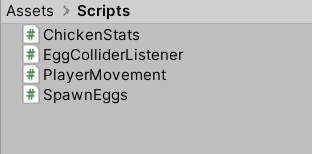
Now, it’s time for some item collection. Firstly, add in the script for the chicken to collect and keep track of the eggs.
If you have imported the Unity Package, edit the script ‘ChickenStats’. It can be found under Assets > Scripts.
We use Visual Studio Community 2019 to edit code, you can download it here!
However, if you have not imported the Unity Package, follow the steps below:
- Create a script called ‘ChickenStats’’.
- Create these variables at the start of your script.
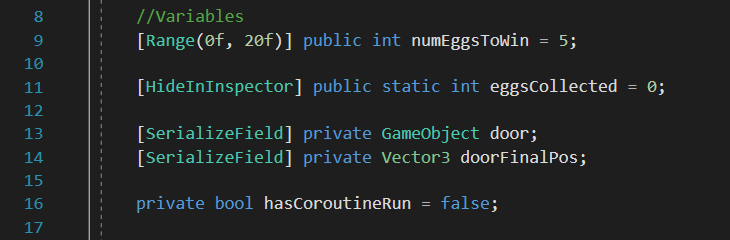
Likewise, you can copy the codes here:
//Variables
[Range(0f, 20f)] public int numEggsToWin = 5;
[HideInInspector] public static int eggsCollected = 0;
[SerializeField] private GameObject door;
[SerializeField] private Vector3 doorFinalPos;
private bool hasCoroutineRun = false;
Subsequently, add the item collection script to your chicken. Then, write this method to collect the eggs.
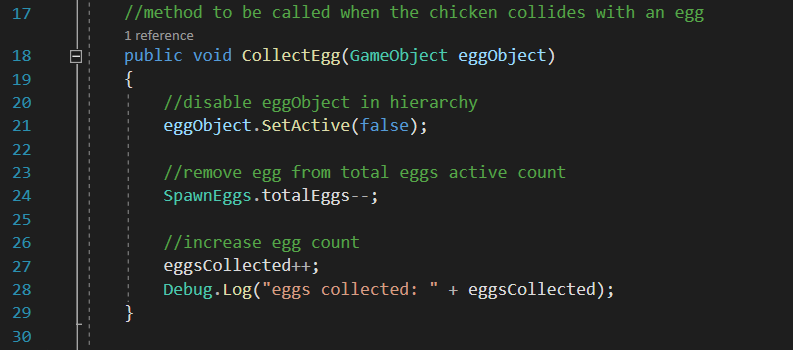
Similarly, you can copy it here:
//method to be called when the chicken collides with an egg
public void CollectEgg(GameObject eggObject)
{
//disable eggObject in hierarchy
eggObject.SetActive(false);
//remove egg from total eggs active count
SpawnEggs.totalEggs–;
//increase egg count
eggsCollected++;
Debug.Log(“eggs collected: ” + eggsCollected);
}
Step 4: Egg Collider Script
If you have imported the unity package, edit the ‘EggColliderListener’ script. You can find it under Assets > Scripts.
Nonetheless, if you have not imported the unity package, create a script called ‘EggColliderListener’.
Then, add this script to all three of your eggs but remember to apply the script to the egg prefab!
For this item collection Script, we’ll be using the built-in Unity method. As a result, this method is able to detect whenever our player is in the trigger zone of the egg, and get them to collect it. Likewise, you can read more about it here. Write in this method below.
Similarly, feel free to copy it here:
//Variables
[SerializeField]
private string playerTag = “Player”;
//when something enters the egg’s trigger zone, check if it is the player character
private void OnTriggerEnter(Collider other)
{
if (other.gameObject.CompareTag(playerTag))
{
//call the collect egg (item collection) method on the chicken
other.gameObject.GetComponent().CollectEgg(gameObject);
}
}
Step 5.1: Opening the Door
Next, let’s provide a way for our chicken to escape the environment! Firstly, we’ll lower the door and let the chicken escape once it has collected a certain amount of eggs.
Hence, let’s write a method that opens the door. Additionally, this method will also cover the animation of the door lowering.
So, edit the ‘ChickenStats’ script, and include this method.
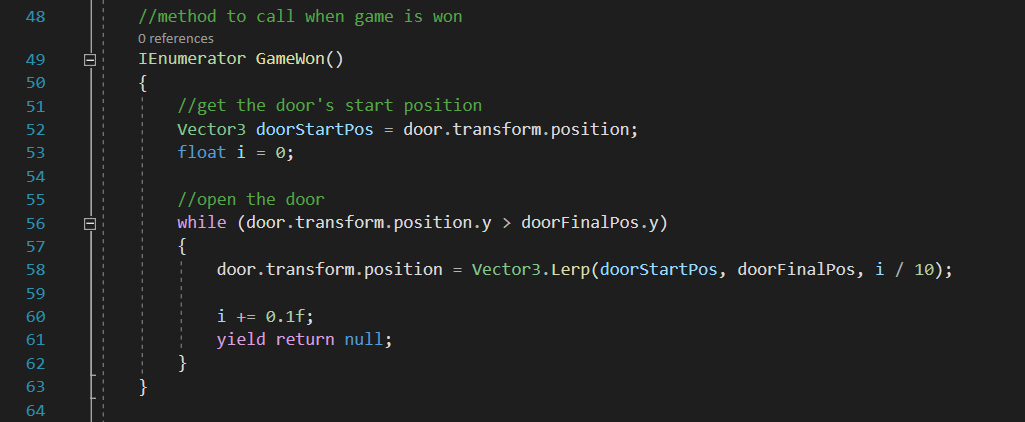
Vector3.Lerp is used to move an object from one position to another smoothly. Hence, it doesn’t just shoot to that position abruptly and looks more natural. For more details, take a look at the official documentation here!
Similarly, you can copy the method here:
//method to call when game is won
IEnumerator GameWon()
{
//get the door’s start position
Vector3 doorStartPos = door.transform.position;
float i = 0;
//open the door
while (door.transform.position.y > doorFinalPos.y)
{
door.transform.position = Vector3.Lerp(doorStartPos, doorFinalPos, i / 10);
i += 0.1f;
yield return null;
}
}
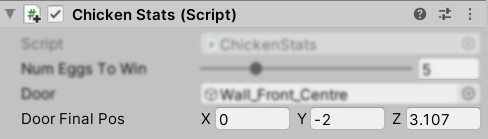
After that, in the Unity Editor, drag and drop the front door of the restaurant from the hierarchy into the ‘Door’ field in the ChickenStats component.
However, take note that if you have imported the Unity package, this door is called ‘Wall_Front_Centre’.

Next, we have to then determine what the final position of the door should be. So, this will be when the door is open for the chicken to escape. Thus, key in the coordinates of its final position into the ‘Door Final Pos’ variable. Here’s what our coordinates look like.
If you have imported the Unity Package and are using the scene we’ve provided, make sure that the final position of the door is low enough that the invisible collider will not block the chicken from its escape even after the door has been lowered. Here’s a closer look.

Step 5.2: Setting Win Condition
Now, back to the script. Let’s ensure that the method we have written is called when the win conditions have been met. In this case, we will then check if enough eggs have been collected. Basically, this will be done in the Update() method, which runs every frame. Do take a look at the documentation here if you’d like to find out more.
Next, write this script in the Update method.
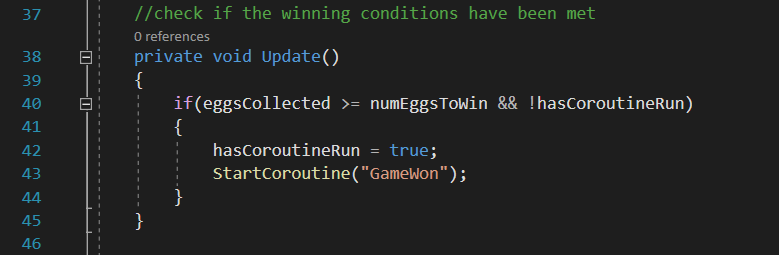
Likewise, go ahead and copy it here:
//check if the winning conditions have been met
private void Update()
{
if(eggsCollected >= numEggsToWin && !hasCoroutineRun)
{
hasCoroutineRun = true;
StartCoroutine(“GameWon”);
}
}
Tip: You can also change the number of eggs the chicken has to collect to win by changing the ‘Num Eggs To Win’ slider in the inspector.

And that’s it for this tutorial!
In Summary
Hooray, our item collection and monitoring player stats tutorial has finally come to an end. Now, our chicken can collect the eggs. Moreover, they have a way to escape from the environment! Hence, stay tuned for tomorrow’s tutorial, where we’ll implement chicks, checks and death! <3
If you’re interested in finding out more about the game dev process, do follow our Instagram page @noodletsstudio! Moreover, not only will we be posting updates on the game we’re developing, we’ve also been putting up handy dandy tutorials on different aspects of game development. Above all, we currently have some tutorials on simple particle effects and mobile joystick movement up! So, do check us out 😉