Intro
It’s Chicken Time! Chicken Time is a simple mobile game reminiscent of Snake. Y’know — that retro game where you control a snake that eats fruit and grows real long? Yeah! We’ll be recreating that, but making it 3D and replacing the snake with chickens. Because… chickens……
We’ll be posting a series of tutorials every weekday! At the end of the series, you’ll have your own version of Chicken Time that you can play on any Android mobile device 😉
Are you a newcomer? Welcome! We recommend reading this article first!
In today’s tutorial, we’ll be covering the scene set-up. A simple start!
_________________________________________________________________________________________________________
Step 1: Create a standard 3D project
Step 2: Set-up the play area
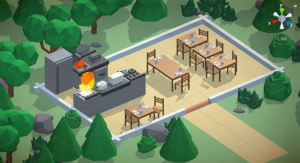
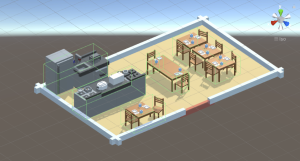
We wanted our game to take place in a small restaurant that was on fire. To ensure our game had style but our assets still remained low-poly enough to work on mobile, we decided to use voxel assets.
We used Too Many Items’ Kitchen pack. This is our set-up:
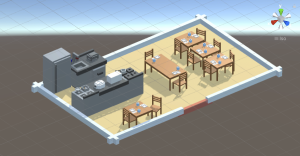
We used cubes for the walls, and a plane for the floor.
- Note: If you want the walls to be as low as ours, the colliders of the wall must be high enough that your player’s character will not accidentally jump over/through your walls.
If you are having trouble coming up with a setup for your play area, you can check out this board we have made. We looked up different types of voxel environments and used them as an inspiration for our final setup. It always helps to collect references to get a clearer idea of what you want to make, so we recommend you do this too!
Step 3: Add colliders to all the furniture / obstacles in your play area
Create an empty game object and add as many collider components as there are big obstacles in your scene.

Step 4: Add in props for decoration!
I added a fire particle effect to the stove + flora around the restaurant.

The fire is ‘FX_Fire’ from the Simple FX – Cartoon Particles Pack, and the trees, bushes and rocks are from the Low-Poly Nature Props Pack.
Step 5: Apply some Post-processing effects to your scene
- Import the Post-Processing package using the Unity Package Manager.
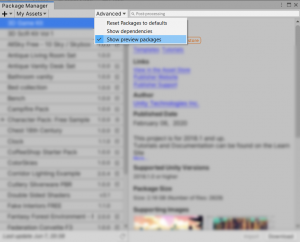
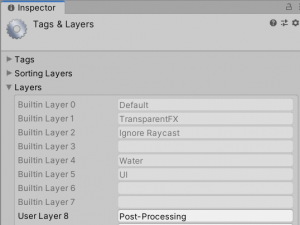
If you can’t find it, make sure that “Show preview packages” is enabled! - Create an extra layer and call it “Post-Processing”. Add the camera and all the furniture and decor you’ve laid out in your scene to this layer.

- Add the ‘Post-process Layer’ component to the camera. After pressing ‘This’, add the ‘Post-process Volume’ component to the camera as well.
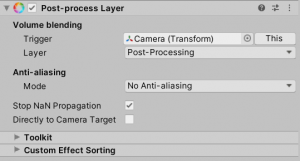
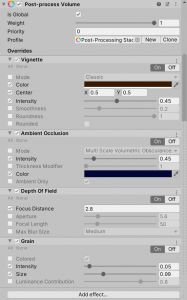
- Now, add all the post-processing effects you want! Make sure not to add too many, though, or your mobile device won’t be able to handle all of them. These are the effects we added:
The final result:
All right! You’ve taken your first steps to making your version of Chicken Time a reality~ Check back in tomorrow for our tutorial on simple movement using buttons for mobile devices.
_________________________________________________________________________________________________________
If you’re interested in finding out more about the game dev process, do follow our Instagram page @noodletsstudio! Not only will we be posting updates on the game we’re developing, we’ve also been putting up handy dandy tutorials on different aspects of game development. Currently, we have some tutorials on simple particle effects and mobile joystick movement up! Do check us out 😉