Intro
Welcome back to Chicken Time! Chicken Time is a simple mobile game reminiscent of Snake.
We’ll be posting a series of tutorials every weekday! At the end of the series, you’ll have your own version of Chicken Time that you can play on any Android mobile device 😉
Missed the first part of this tutorial series? You can check it out right here!
_________________________________________________________________________________________________________
If you want to jump right into this tutorial without having to set up your own environment, or you just want to follow exactly what we did, go ahead and import this package into your project. It contains all the assets you’ll need, along with a ready-to-use scene!
Note: Import the Post-Processing package using the Unity Package Manager after importing the aforementioned package.
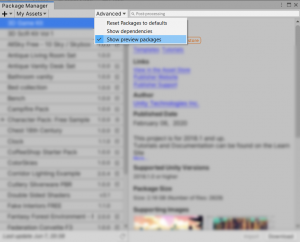
If you can’t find it, make sure that “Show preview packages” is enabled!
In today’s tutorial, we’ll be covering how to make snazzy menus, and exporting our completed game to Android devices.
This is the final entry in this tutorial series! Strap in and let’s finish this with a bang!
_________________________________________________________________________________________________________
Before we get started…
Import the required assets! Our lovely in-house artist Nicole drew a beautiful illustration to use in the start menu, you can download the Unity Package here.
Also, if you’re sad that the series is ending, don’t be! We have a little something at the end for you to keep and display to remember us by 😉
So make it past this last stretch to see what’s waiting for you!
Step 1: Menu UI
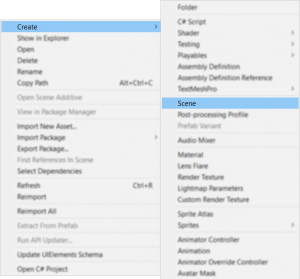
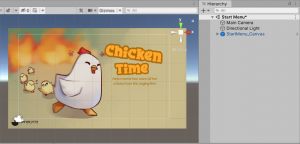
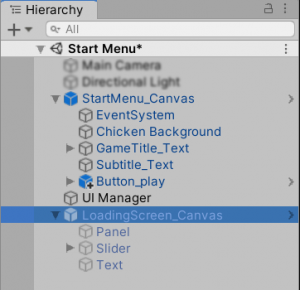
Let’s add a menu to our game! Create a new scene to contain the start menu UI and call it ‘Start Menu’.
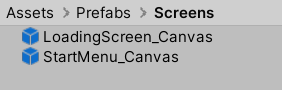
Drag and drop the StartMenu_Canvas prefab into the scene. It can be found under Prefabs > Screens.
It should look like this.
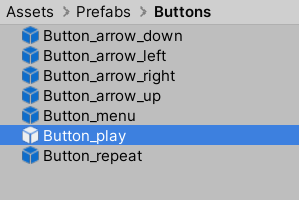
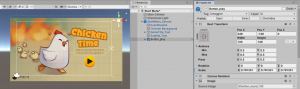
Next, add a play button to the screen. You can find it under Prefabs > Buttons.
You can follow our settings for the button placement here.
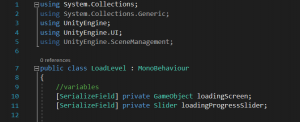
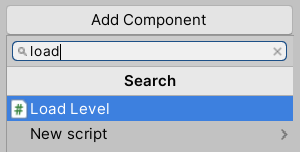
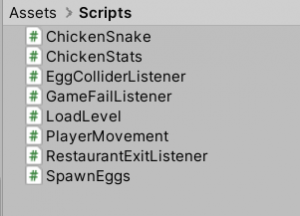
If you have imported the Unity Packages, you can find the ‘LoadLevel’ script under Assets > Scripts.
If you have not imported the Unity Packages, create a script called ‘LoadLevel’.
Add the lines ‘using UnityEngine.UI;’ and ‘using UnityEngine.SceneManagement;’ before the class declaration.
Add in these variables.
You can copy them here:
using System.Collections;
using System.Collections.Generic;
using UnityEngine;
using UnityEngine.UI;
using UnityEngine.SceneManagement;
public class LoadLevel : MonoBehaviour
{
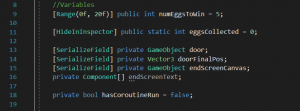
//variables
[SerializeField] private GameObject loadingScreen;
[SerializeField] private Slider loadingProgressSlider;
Wouldn’t it be neat to add a little egg slider?
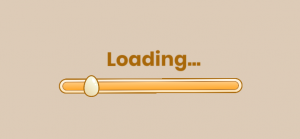 Let’s add a coroutine.
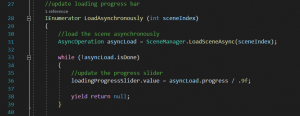
- In line 31, it loads the game scene asynchronously (in the background)
- In lines 33 to 39, it updates a slider, which is the loading progress bar based on the amount loaded.
You can copy the method here:
//update loading progress bar
IEnumerator LoadAsynchronously (int sceneIndex)
{
//load the scene asynchronously
AsyncOperation asyncLoad = SceneManager.LoadSceneAsync(sceneIndex);
while (!asyncLoad.isDone)
{
//update the progress slider
loadingProgressSlider.value = asyncLoad.progress / .9f;
yield return null;
}
}
Next, add this method in.
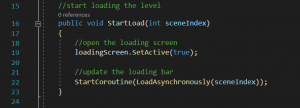
- In line 19, it activates the loading screen.
- In line 22, it calls the coroutine that will update the loading progress bars and switch scenes from menu to game when done loading.
You can copy it here:
//start loading the level
public void StartLoad(int sceneIndex)
{
//open the loading screen
loadingScreen.SetActive(true);
//update the loading bar
StartCoroutine(LoadAsynchronously(sceneIndex));
}
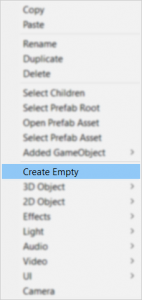
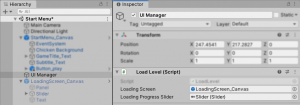
Create an empty game object. This will be our UI Manager — it will hold all the scripts the buttons will use. It’s always good to have a main game object to handle scripts whenever possible, so it’s easier to locate and change scripts!
Add the ‘LoadLevel’ script to the game object.
Drag and drop the LoadingScreen_Canvas prefab into the scene. Again, it can be found under Prefabs > Screens.
Drag and drop the LoadingScreen_Canvas and the Slider (child) into the respective fields in the LoadLevel script component on the UI Manager.
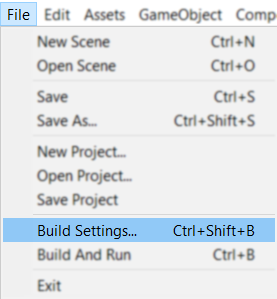
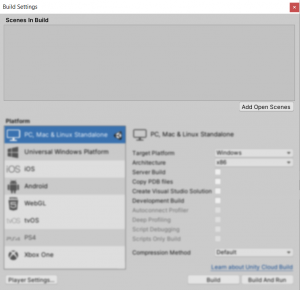
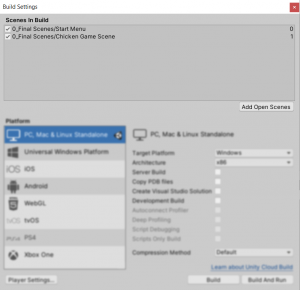
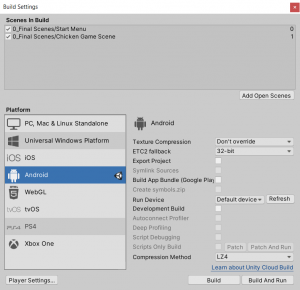
Now, let’s piece together the game. Add the ‘Start Menu’ scene and ‘Chicken Game Scene’ to the build. You can do this by going to File < Build settings.
Drag and drop the two scenes from the project window into the ‘Scenes in Build’ section of the Build Settings.
Next, we’ll add functionality to the play button.
First, select the play button in the start menu. In the Inspector, check its ‘Button’ component.
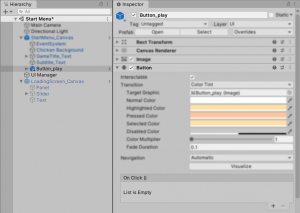
Under ‘On Click()’, press the + button to add a function to the button. Drag and drop the UI Manager game object from the hierarchy to the ‘None (Object)’ field.
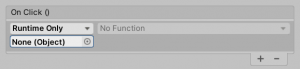
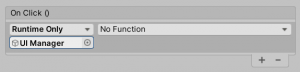
Next, assign the StartLoad(int) method to the button.
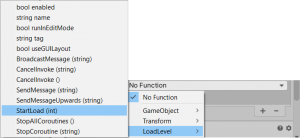
We want this button to load the game scene, so we need to change the number (next to the game object field) to the index of the game scene.
Note: You can check the index of the scenes in the Build Settings (File > Build Settings).


As our game scene is index 1, we’ve changed the number to 1.
Step 2: Adding Buttons
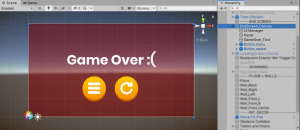
Let’s add two buttons to the game over screen — one button to take the player back to the start menu, and another to let them replay the level.
First, add the Button_menu and Button_repeat prefabs to the EndScreen_Canvas. The buttons can be found under Assets > Prefabs.
Here’s how we positioned ours!
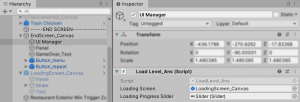
Just like before, create an empty game object labelled ‘UI Manager’ and add the ‘LoadLevel’ script to the game object.
Drag and drop the LoadingScreen_Canvas prefab into the scene. It can be found under Assets > Prefabs > Screens.
Drag and drop the LoadingScreen_Canvas and the Slider childed to it into the respective fields in the LoadLevel component on the UI Manager.
As before, let’s add functionality to the buttons.
We want Button_menu to lead to the start menu scene, so we left the number at 0. This is the index number of the start menu scene in our build. The replay button should reload the same game scene, so we changed the number to 1.
Step 3: Winning and ending
What if the player wins the game? No end screen pops up then. Let’s repurpose our code a bit so that the end screen pops up when the player wins and leaves the restaurant.
Edit the ‘ChickenStats’ script and add in a new array.
You can copy it here:
private Component[] endScreenText;
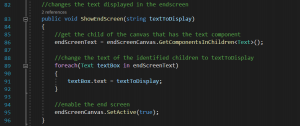
Create a new method.
- In line 95, it activates the end screen
- From lines 86 to 91, it changes the text displayed in the end screen. This is based on what string is passed into it.
Feel free to copy the method here:
//changes the text displayed in the endscreen
public void ShowEndScreen(string textToDisplay)
{
//get the child of the canvas that has the text component
endScreenText = endScreenCanvas.GetComponentsInChildren<Text>();
//change the text of the identified children to textToDisplay
foreach(Text textBox in endScreenText)
{
textBox.text = textToDisplay;
}
//enable the end screen
endScreenCanvas.SetActive(true);
}
We no longer need the GameFail method to activate the end screen in the hierarchy since this method does that too. So replace the content in the GameFail method with this.
You can copy it here:
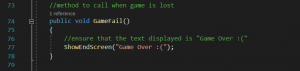
//method to call when game is lost
public void GameFail()
{
//ensure that the text displayed is “Game Over :(”
ShowEndScreen(“Game Over :(“);
}
We’d like the end screen to appear with the words ‘You Win! :)’ when the player successfully collects the minimum amount of eggs required and escapes.
First, create an empty game object, or a cube. Add three colliders to the object and set all three of them as trigger zones.
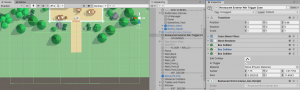
If you have imported the Unity Packages, edit the script ‘RestaurantExitListener’. It can be found under Assets > Scripts.
If you have not imported the Unity Packages, create a script called ‘RestaurantExitListerner’.
In order to get the end screen to appear with the aforementioned congratulatory phrase when the chicken enters the trigger zones, we have to add in this method.

Feel free to copy it here:
private void OnTriggerEnter(Collider other)
{
if(other.gameObject.GetComponent<ChickenStats>())
{
other.gameObject.GetComponent<ChickenStats>().ShowEndScreen(“You Won! :)”);
}
}
Step 4: Exporting the game
We can’t end this without exporting the game, so let’s do that!
Open up the build settings and switch the target platform to Android. You can do this by going to File > Build Settings.
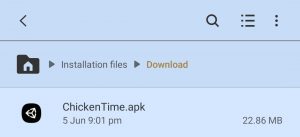
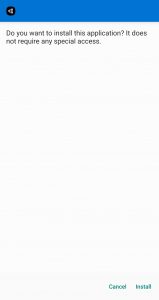
Select ‘Build’ and an APK will be downloaded. Now, you can transfer the APK to your phone and install it in!
We’ve finally come to the end of our tutorial series, thank you and congratulations on following us on this journey! Now, you too have your own Chicken Time to play with!
The loading screen code was based off of the official Unity Documentation on Asynchronous loading, we recommend you check it out to get a better understanding.
Remember the surprise we mentioned at the start? We’ve uploaded a link to a downloadable chicken time wallpaper, it can only be found in our bio @noodletsstudio! If you’ll miss us, then feel free to drop us a message there or check out the game we’re currently working on!
It has been a lovely journey with you, thank you for following us in Chicken Time, we really appreciate it!
Stay tuned for one last article, where we share about our thoughts and reflections during these hectic times!
_________________________________________________________________________________________________________
If you’re interested in finding out more about the game dev process, do follow our Instagram page @noodletsstudio! Not only will we be posting updates on the game we’re developing, we’ve also been putting up handy dandy tutorials on different aspects of game development. Currently, we have some tutorials on simple particle effects and mobile joystick movement up! Do check us out 😉